Tech - Radiator Shield


So there you are, flying through the woods on a gravel road. The dust ahead lets you know you have caught another competitor. You pull in close and all of the sudden smoke comes pouring out of the front of your car! The race is over as the oil light comes on and your engine begins to overheat. What happened? Well that car you caught up to threw a bunch of rocks at your front end, cracking your radiator, headlights and oil cooler. Here's a cheap little fix for that situation and it works for following cement trucks or driving through a locust swarm.

TOOLS/PARTS NEEDED: Various wrenches and sockets from 10mm to 14mm, a phillips screwdriver, a flathead screwdriver, tin snips or wire cutters, a bag of 6" zip-ties, a roll of 1/4" galvanized wire mesh, and a can of your favorite paint.

PROCEDURE:
W
e will be making a "catch" for anything that wants to ding your radiator, oil cooler, condenser and everything that's exposed between your highbeams. I chose 1/4" mesh since I couldn't find any 3/8" and 1" is too big in my opinion to make a difference anyway. The roll of mesh I bought from Home Depot measures 2'x5' for about 6 dollars and a bag of 6" zip-ties from Radio Shack will set you back 2 dollars. I also bought a can of red-orange paint since that will be one of the primary colors on the new paint scheme. You may want to choose black since it will be almost invisible in that color.

Let's start by taking the grille off. You should pop the hood and leave it closed so the nose is left open. The center grille piece should be removed first. Use a flathead screwdriver to carefully remove the 2 clips that hold it into place. Then just lift that piece out of the way, rocking it slightly forward. The two other grille pieces have 3 clips up top, 2 screws on the bottom and 2 screws that also hold the blinker assembly in place. Use the flathead on the clips and the phillips screwdriver on the screws. You will have to totally disassemble the blinker to get the grille off. BE CAREFUL to take your time with the blinker housings. Make sure the screws come all of the way out BEFORE you pull on it or you'll break a mounting point like I did. A rubber boot behind the blinkers helps to provide a weather resistant seal as well as difficulty in removal. Once it breaks free, twist the blinker housing so the lower wide end of the it comes out the back of the grille first. Installation will be putting the upper skinny side in first.

Now you can completely remove the main grille pieces.


Also, now might be a good time to clean them up and hit them with some Armor-All to make them nice and black again. Get out your roll of mesh. I found that 2' is just about the perfect width for the distance between the highbeams. However, I would recommend using an extra 4". So, cut a piece off that is 10"x28" and grind the edges on the pavement to make them smoother. The stubby ends will grab the plastic and metal of the car and make installation for measurement and trimming a super pain - it's already going to be hard enough as it is. Unscrew the top bolt that holds the little center post. This will give you a little extra room to work with. Slide your screen in and position it so that it totally covers the area between the headlights. Now rebolt that centerpost with the screen behind it (the bolt should go through the screen.) Here's where you get some creative license. You need to perform a trial assembly so you can trim all of the mesh that will be in the way. Be mindful of the fins on the back of the left and right grille pieces that protrude back around the highbeams. As you put these grille pieces in place make a note of where to trim the mesh so the grill won't put pressure on it. Zip-tie the mesh to the center post in two places so you have a good hold there. Trim the upper and lower portions of the mesh to fit the same boundary the grille pieces use. This way, the grille can hold the mesh in place as well.


After a lot of clipping with your tin snips or wire cutter, cursing, etc. you should have complete coverage with a little bit of "spring" in the mesh. I feel it is better to have a little bit of flex in the mesh so it can absorb some of the velocity of the incoming rock, bugs, and birds instead of it being rigid and risk being punched through. At this point, you may not even feel like taking it back out to paint it. It doesn't look too bad with the metal color, but painting will give it a nicer look and help protect the metal as well. Go ahead and remove the screen and hang it up somewhere where there isn't any wind. I used some wire to hang it from some conduit going to a light fixture in the parking garage. If you paint it on a flat surface, you'll make a mess, and have to wait for one side to dry before painting the other.
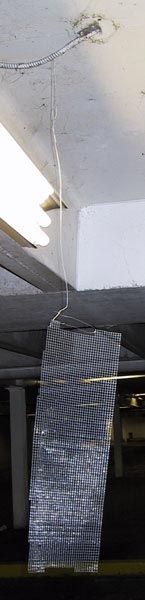
Shake that paint can up good and start applying multiple light coats until the entire screen is covered on both sides. Let that dry and do it again. Use the light to check the glare for any areas that need more paint. After you 
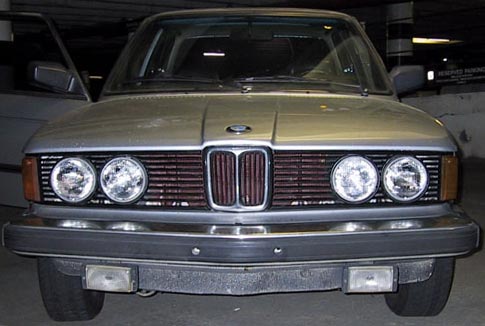
are content with the finish and it has dried, it's time for final assembly. You will still have to wrestle the piece in, but be glad to know that this is the last time you have to do it. As for me, I need to redo mine because I didn't quite get the 
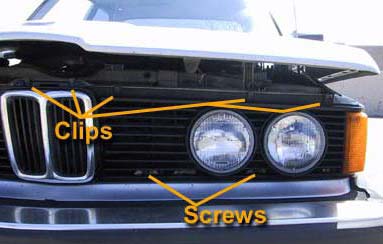
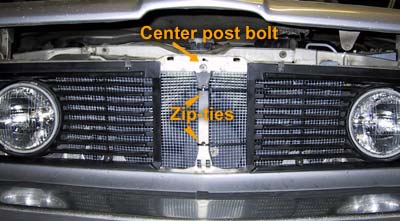
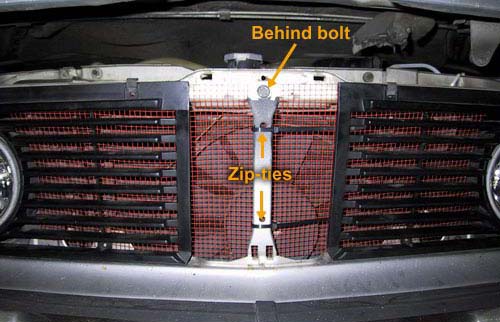
coverage I wanted. Don't forget to put the screen behind the center post bolt and zip-tie the middle pieces. Clip the unused portions of the zip-ties off. It will take a little extra effort to clip the grille back into place but not much. Remember to put the blinker housing in using the upper skinny end first.


CLOSING NOTES:
N
ow you hopefully have a little extra peace of mind in knowing that your radiator is safer than it was before. If you are feeling up to it, give the same treatment to the openings below the bumper as well. I haven't done them yet because I will be compressing the bumper and installing a 1/4" aluminum skidplate. You'll notice that eventhough I painted my screen red-orange, you can barely see it. I still don't recommend driving at top speed through a bird sanctuary, but I always hated looking at my radiator and seeing twigs and bugs stuck to it with the fins bent. I have not experienced any noise from the assembly or any engine cooling problems. I didn't think I would anyway.