 Tech - Valve Adjustment
Have you ever wondered why your engine sounded like a diesel or that it was "knocking" at idle
speed when it was warm? Well, check your oil level and if it's not that, I bet your valves need to be adjusted.
After now having completed the job on my 1983 US spec BMW 320i (with 151,000 miles) and giving it a test drive, I have to say that it
was quite simple and resulted in smoother engine performance and a little more power restored. I took my time, was really careful, and it
only took about an hour. The walkthrough below is the same for the 4 cylinder engines from the BMW 316, 320, 320A
and 320i through 1983, both European and US spec models.
TOOLS/PARTS NEEDED:10mm wrench, flathead screwdriver, rachet with a 10mm socket (optional but helpful), a 7/64"
Allen Wrench (or a similar thin piece of semi-rigid material, like a piece of coat hanger), a .006" feeler gauge and MAYBE a valve cover gasket if
yours gets torn during removal (mine was fine).
PROCEDURE:
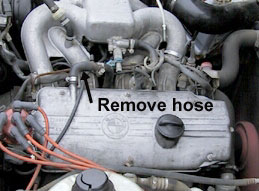
First thing to do is to make sure the car has completely cooled down (not even warm to the touch.) Remove the breather hose from the valve cover by usually loosening the
hose clamp that holds it on with a flathead screwdriver. Be sure to check the end of this hose for cracks then just push it out of the way. Also, if you
have a vacuum line going to the distributor, unpulg it from JUST the distributor and move it out of the way as well. Leave the other end attached since it's a pain
to reconnect. Again, check for cracks.
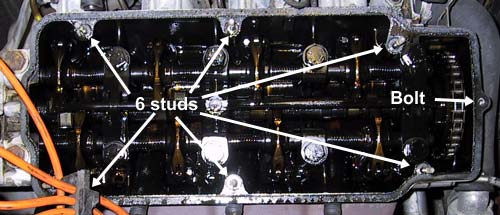
Next up is to loosen the valve cover nuts and bolt with a 10mm socket and rachet (or use the 10mm wrench but
it's a little slower.) Just break the 6 nuts and 1 bolt loose first before taking them off to relieve the stress. Then proceed
to remove the 6 nuts and 1 bolt. Carefully pull the valve cover off. It will stick a little to the gasket and if there are any
washers under the nuts, they will make the cover hard to remove. Once the cover is off make sure to put it somewhere that dust,
leaves, mosquitos or anything has no chance of getting into it. Also be very mindful that now your engine is exposed and the wind
can and will drop a little present in your cylinder head if you're not careful (for example - a little piece of hood insulation.) This
picture shows the locations of the studs the nuts screw onto as well as the bolt hole.
Here is the tedious part. With clean hands (that need to stay grit-free), start testing the rocker arms for
looseness in an order that makes sense to you. Grasp the valve end of each arm and move it up and down to see if you hear clicking.
If you don't hear any clicking at all then that rocker arm is under tension from the camshaft and cannot be adjusted right at this
moment. If you are familiar with camshaft design, make sure the corresponding lobe is pointed far away from the other end of the rocker
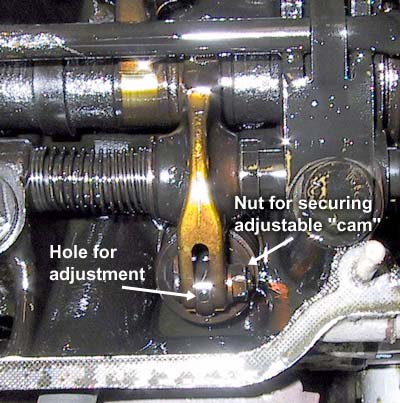
resulting in the maximum "freeplay." Make a note of which ones were loose and begin to work on the first one. Loosen the nut that secures the rocker
adjustment "cam" with a 10mm wrench. You may have to put enough pressure on it that the valve spring will compress a little before the
nut breaks loose. Loosen the nut a little bit and insert the short end of a 7/64" Allen Wrench (or similar device) into the small hole in the adjustment
cam. Rotate the cam a little to make sure it's easy to adjust.
Get out a .006" feeler gauge and put it in between the adjustment cam and the valve tip. You may have to mess with the cam and feeler gauge a little to
make sure the cam puts pressure on it and doesn't just shove it out of the way. Once you have that set, put enough pressure on rotating the adjustment cam to where the
feeler gauge is somewhat difficult to drag out but easy to rotate. Now get your 10mm wrench ready to tighten the cam's securing nut.
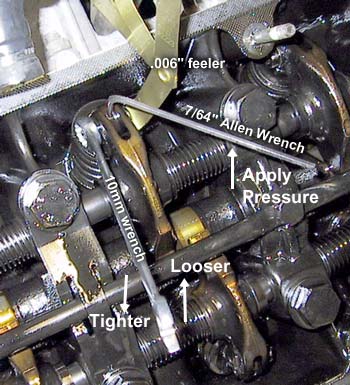
As you begin to tighten the nut, keep a steady light pressure on the Allen Wrench (or similar device) since the adjustment cam
may want to rotate. Also keep in mind that as you are tightening with one hand, the other hand may want to put extra or not enough pressure on the cam.
Try to keep a steady ammount of pressure. Continue tightening the nut until it is somewhat difficult to tighten with two fingers (depending on your
finger strength of course.) The main goal is to tighten it ENOUGH. If you strip the threads out on this piece, you are in a world of trouble.
Assuming all
went well, you have now successfully adjusted that rocker arm's clearance back to factory specs. Follow the same procedure with the other loose ones. When you are done with
those, get in the car and "bump" the engine a little by turning the key on then back off quickly until one or more of the previously "tight" rockers is loose for adjustment. It would be a good idea
to unplug the coil before "bumping" the ignition to keep the engine from starting. After a little while you should be done adjusting all of the rockers. Reinstall the valve cover
and tighten it down pretty good.
CLOSING NOTES:
Where there was once valve chatter, there is now almost complete silence. "But I can still hear a faint ammount
of chatter..." To really be precise about it, you need to only adjust the rockers that have the camshaft lobe all of the way pointed
away from it. At that point, there is the maximum "freeplay" for the rocker arm and you are assured that the camshaft hasn't even thought
about engaging the rocker yet. At any other point, there is the potential that the lobe is closer to the rocker which will
give you an inaccurate reading (by up to .002" if your valves were in bad need of adjustment.) Now go out on the road and
enjoy better and smoother performance! Check the valve cover for leaks and NEVER do this procedure without a feeler gauge.